Archive
Summer Pale Ale 2014
 This past weekend I brewed a 20 gallon batch of American Pale Ale with a friend. The BeerSmith 2.0 recipe can be found here. We used my 20 gallon kettle setup with the pumps & control box, and things went reasonably well – we hit all of our targets for volume and gravity, and the electronics did what they were supposed to with one exception – during our vorlauf / recirculation step the high level switch didn’t turn on the pump one cycle. We caught it before it became an overflow situation, but there was no obvious reason why this hiccup occurred. My belief is that the XBee Coordinator modem had one of its problematic data floods and missed the communication from the grant. Unforuntately that issue persists and I am no closer to resolving it. I think it is a Digi firmware problem, and there is very little I can do about that other than wait for a new version to be released.

 Once the sparge began, we didn’t have any further issues with the electronics. The sparge arm worked as expected, and the control box managed the pump cycles appropriately. The sparge rate history screen even proved its worth as we watched our sparge rates slowly drop from the high 1.9 qt/min down to 1.7 qt/min, followed by a steep drop to near 1.0 qt/min, signaling a stuck mash. We added some hot liquor, stirred up the mash bed some, and did a quick recirc to resolve it. The flow rate was not a problem after that, and we lost maybe 10-15 minutes max. The boil was uneventful, and we collected 20 gallons in our fermenters. We pitched 2 vials of WLP001 into 2 of the fermenters, WLP051 into the third, and US05 into the fourth.
 Jake took 5 gallons home with him, and the other 15 stayed with me. The fermentation was rocking and rolling less than 24 hours later. When I checked on them about 12 hours after that, one of the carboys (the WLP001 I think) was so active that it filled the headspace with yeast and blew the airlock. I had to quickly scramble to resanitize, and added some foam control to knock the yeast back down. I’ll give the yeast another week to clean up and flocculate out before transferring them to secondary fermenters for dry-hopping and aging.
With my brewing activities approaching a summer hiatus, I am unsure what new brewing-related mayhem I will perpetrate this summer. One possibility is resurrecting the control box to PC data stream to capture and display session data, but that’s not really terribly exciting to me. Another (much stronger) possibility is implementing an Arduino mini & Bluetooth-based temperature monitoring system for my fermenters. This latter idea was inspired by a friend, Mike Castagno. It would be really cool (and useful) to design a system that collected the fermenter temperatures and sent the data wirelessly to the PC, and use a VB.NET Windows service to collect and log that information to a database. If the database were hosted online, you could even display that data on a webpage and remote monitor what is going on. We shall see if I can bring that particular vision to reality.
BrewzNET 2.0 Menu Screen Details
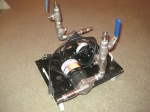
For some weeks now I’ve been meaning to post video or pictures of the menu screens for the pump control box, but time has managed to get away from me. I’ve been busy integrating two new stainless Chugger pumps to replace the March industrial surplus ones I’ve used for the past 8 years, which also necessitated reworking the wiring to use standard 3-prong plugs instead of the monster Molex ones I had for the old pumps. It works… I can’t say it’s the prettiest thing ever, but using super glue on plexiglass always seems to create this milky-white deposit everywhere that is a pain to clean up.
I ultimately settled on taking static pictures over video, mostly because recent experience (my previous post) proves that I am not the sort of person that can simultaneously narrate and maintain a steady camera. Thank goodness for YouTube’s enhancement options.
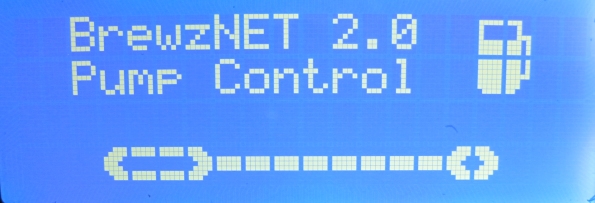
Bootup / Splash Screen
When the control box is first turned on, it displays a “splash screen” with a mash paddle and a beer mug (or as close as I could approximate them with 5×7 dot matrix characters). Pushing any of the navigation buttons brings up the first “true” menu screen.
SCREEN 1 – Main calculations
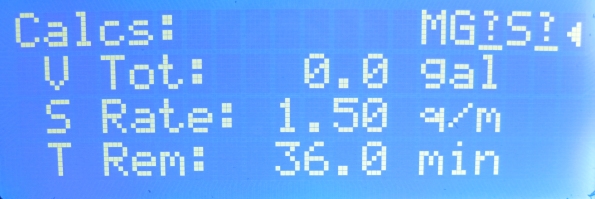
The main calculation screen displays the key information used during the mash stage of brewing, and is what I display 95% of the time. In the upper right corner is a 5 character summary of what current system state. The first character (shown as an M) stands for the current pump control mode. “M” = Manual, “R” = Recirculation / Vorlauf, “S” = Sparge. More on that a little later in screen 4… The next two characters show the wireless device status for the Grant. The question mark means it is currently not connected / turned on, and a small antenna would indicate it is connected. The final two characters are similar to the previous two, except they display the sparge arm connection status.
The second through fourth lines display the three pieces of information I use most frequently during the mash: Total volume connected in gallons, current sparge rate in qt/min, and how much time is left in the sparge to collect the pre-boil batch volume in minutes. The volume collected can be tweaked up or down in 0.1 gal increments as required, which automatically adjusts the remaining time based on the current sparge rate. Adjustment is useful when you reconfigure the hoses to run into the kettle and forget to switch the control box mode, or if something unforeseen happens (like a power blip) and wipes out the system state.
SCREEN 2 – Secondary Calculations
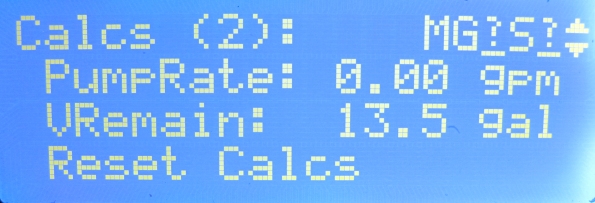
The second menu screen has the same 5 character system status display in the upper right corner, and lines with a couple of additional pieces of useful information – pump rate and remaining volume. There is also a function to reset the system calculations back to an “initial state” if that is required.
SCREEN 3 – Sparge rate history
The third screen displays a history of the past 6 calculated sparge rates. I wasn’t running the system when I took the picture, so there is nothing displayed – but if you watch the video in the previous post, you will see a great example of this starting around the 2:07 mark. This history is useful to determine if your mash is headed towards “stuck” – sparge rates would drop consistently over time. This enables you to rake or cut the top of the grain bed, adjust your flow rates, or take whatever corrective action you feel is appropriate to prevent it.
SCREEN 4 – Pump control mode
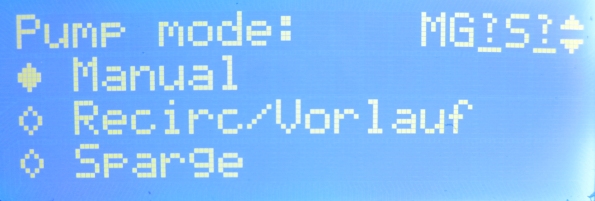
The fourth menu screen simply allows you to change the pump control box mode manually.
- Manual mode prevents the control box from turning pumps on and off based on the level switches in the grant and sparge arm. The two switches on the front of the control box serve as the only means to turn the pumps on or off.
- Recirc/Vorlauf mode tells the control box to start calculating the runoff/sparge rate and pump rate, but does not change any of the calculated volumes. This allows you to recirculate the wort until it runs relatively clear and dial in the sparge and pump rates you want by adjusting the ball valves. During this mode only the grant pump is turned on and off.
- Sparge mode performs these same calculations, but also includes collected volume and time remaining calculations. This mode also controls the on/off state of the sparge pump based off the float switch on the sparge arm.
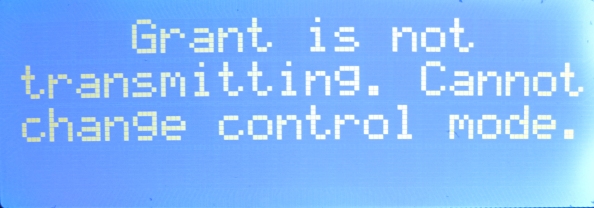
Without the grant float switch position information the control box cannot perform the necessary calculations, so both “Sparge” and “Recirc” modes require that the grant be turned on and transmitting to the control box. If you try to set the modes manually without the grant turned on, the system displays this message.
SCREEN 5 – System Settings
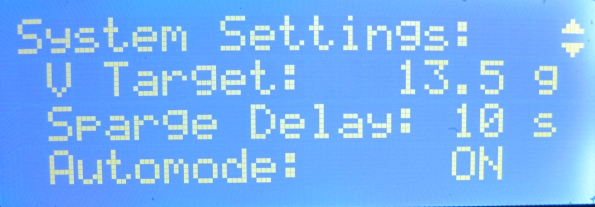
The system has 4 main settings, and 3 of them are shown above.
- The batch target volume, “V Target”, may be set differently from batch to batch depending on how much wort you wish to collect. I typically brew 10 gallon batches, and with dead space and boil off that requires me to collect 13.5 gallons. For 20 gallon batches, I may increase this value for that single session up to 23.5 gallons, or 18.5 gallons for a 15 gallon batch.
- The sparge delay setting controls how long the sparge pump remains on after the float switch goes from a “down” to an “up” position. Setting this value to zero will result in the pump being controlled completely by the float switches without any delay, and the pump will turn on/off much more frequently. I try to top up the tun a little more and cycle the pump less frequently, so about 10 seconds seems to work pretty well in that regard.
- Automode allows the system to automatically progress from Manual to Recirc mode when the Grant power is turned on and communicates with the control box. It also progresses the control mode from Recirc to Sparge when the sparge arm power is turned on and starts communicating. This eliminates the need to go back to the control box and fiddle your way through the menu settings to change the system behavior, and was implemented after my pilot run in response to that experience.
SCREEN 6 – More system settings
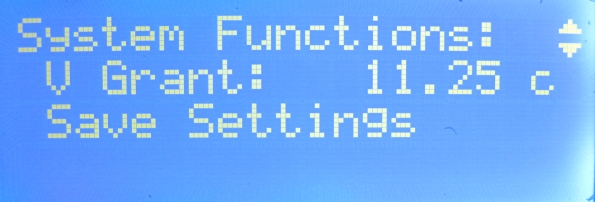
The final system setting is the volume of the grant, Vgrant, in the English/Imperial unit of measure “Cups”. It is not the total volume of the grant – it is the volume of liquid as measured between the lower level switch raising up, and the upper level switch raising up. This should be the same as the volume required to drop the top switch down to when the bottom switch drops. This volume allows the system to perform the sparge and pump rate calculations.
Save Settings allows the current values for the grant volume, target volume, sparge delay, and automode to be saved to memory for the next brew session.
SCREEN 7 – Switch states (for debugging)
The final screen, “Switch States”, is a debugging screen that is useful for ensuring that switch logic is correct and all the wires are hooked up the way they should be.
So that is what I have coded for the BrewzNET 2.0 pump control screen menus. I know it’s not chock full of whiz-bang features, but it does precisely what I need it to without a whole bunch of fuss. Next weekend the plan is to brew a 20 gallon batch of Pale ale, so I will put the electronics through the paces once again and hopefully report back how it went.
French Ale
This weekend I brewed a 10 gallon batch of French Ale, which allowed me the opportunity to put the wireless pump control hardware and a pair of brand-new Chugger stainless pumps through their paces. Below is a video compilation of the segments I shot during that brew session. It is available in HD / full screen if you click the “YouTube” button and watch it directly from their site, otherwise you are stuck with the very tiny embedded display here.
NOTE: I had to re-generate the video and replace the original hyperlink due to some problems with missing captions.
The batch itself seemed to hit most of its targets (as best as I can tell) and is currently fermenting strongly. I say “most” because the original gravity measured 1.060, higher than I wanted. When I reviewed the BeerSmith recipe I found I had formulated it for a 11.2 gallon batch even though I ended up with 10 gallons. This 1.2 gallon difference is an artifact from back when I used ProMash and the program couldn’t account for the deadspace below the kettle valve. When I first started using ProMash I was constantly getting low gravities, so to compensate I measured the volume and built that in to all of my batches as a “fudge factor”. BeerSmith allows you to set up equipment profiles and includes deadspace in its calculations, so I need to stop adding the “extra” from now on if I really want to hit my gravity targets.
 I have said this before, but I LOVE using a false bottom. This batch used only 2 oz of whole hops, German Hallertauer, and they were added as the bittering addition at 75 minutes. The flavor (2oz) and aroma (4oz) additions were French Strisselspalt pellets – I scoured the internet a few months back and could not find any whole Strisselspalt anywhere. Despite the majority of the hops being pellets, the false bottom and small amount of whole leaf hops did a fantastic job of filtering out the pellet debris and the wort that went into the fermenter was very clean.
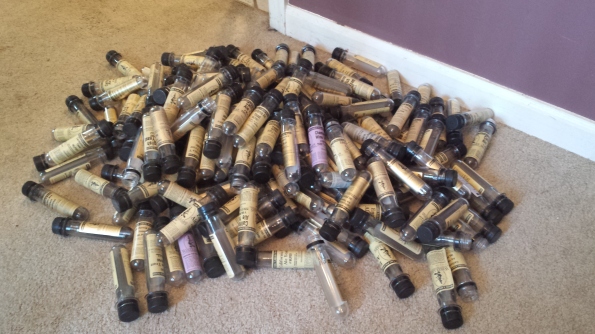
On a completely unrelated note, Donna and I brought all my empty yeast vials out and counted them – I had 182. This is an accumulation over the past 10 years of most of the liquid yeast I’ve used and certainly does not represent the total number of batches / gallons I’ve made. Between yeast starters, dry yeast, Wyeast smack packs, and repitching those numbers are sigificantly higher. At any rate, we sat down and figured out what we want to get from the White Labs Customer Club program and packaged them up to send in. It’s nice to have them gone and out of the way!
Pilot Run – Lessons Learned
The BrewzNET 2.0 hardware had a pilot test run this past weekend on a 5 gallon batch of belgian-style strong dark ale. I wasn’t sure (right up to the hour before) whether I was going to drag the extra gear up and use it, but my enthusiasm ultimately won out. Many things worked flawlessly and others not so much… but those that didn’t were minor and easily addressed without hardware design changes.
The wireless grant performed as designed and without issue. I used it to both recirculate the wort (vourlauf) and run it into the kettle. I even have a video of it in action, although the audio quality sucks at times.
The control box did a great job keeping track of the volumes, rates, and estimating the time remaining in the sparge. During the recirculation I dialed in a good sparge rate and transfer pump rate using the feedback the control box provided, and those carried forward into the sparge cycle.
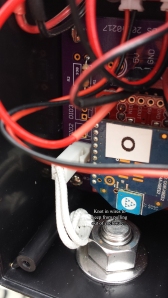 Unfortunately the wireless sparge arm did not work as flawlessly. For the first several gallons I had to manually top up the mash run because the float switch states were not being transmitted at all. I ultimately opened up the electronics enclosure and identified the issue – at some point the wires disconnected from the header, likely resulting from accidently pulling on them at some point. This was easily remedied by tying a knot in the wires to prevent them from pulling through the enclosure hole. Super low tech solution, I know… but highly effective.
Another issue I found is the control logic for the sparge pump doesn’t work how I want it, particularly if the added water is insufficient to toggle the float switch state value. The pump turns off, and never turns back on because there is no subsequent state change. I need to rework this to either keep the pump on for another cycle if the state hasn’t changed, or have the “overtime” begin once the pump switch state goes from down to up. There is a danger that when the HLT becomes empty that the pump will stay on permanently until it is manually turned off… but I could potentially work in a pump maximum time setting to prevent that.
In testing the hardware I also recognized some features that would improve the usability. One significant improvement would be implementation of an “auto mode” setting that progresses the control mode from Manual to Recirc/vourlauf to Sparge depending on the wireless devices being turned on or off. Currently you have to turn on the grant, go to the control box, navigate to the control mode screen and select the mode, and navigate back. Recirc mode could be engaged automatically when the grant is turned on and Manual mode could be set when it is turned off. Sparge mode could be set when the sparge arm is turned on. This could save some unnecessary fiddling with the electronics when you really want to focus on the brewing.
There are a few other minor programming tweaks I want to make, and hopefully I will have then implemented and loaded to the Netduino in time for my next brew session. I want to use that one to capture more video of the hardware in action.
Pump Control Box – V2.0
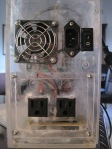
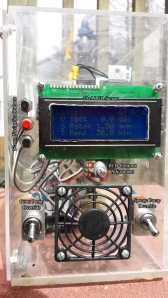 The control box is similar in layout and components to the original “wired” one I assembled back in 2008. The controller component and display have changed, but I was able to re-purpose most of it to accomodate the 2.0 components. The front panel has a cut-out for the LCD screen and three buttons to the left to enable navigation through the screen items. There is a contrast adjustment knob below the screen to modify the LCD screen intensity depending on conditions (daylight vs. nighttime) and two override switches for the pump control. The override basically negates whatever the current pump state is – so if the microcontroller has them turned off, you can turn them on, and vice versa. I will try to do a video or post about the various screens and options sometime soon.
The control box internals are identical to before with the exceptions I cited earlier.
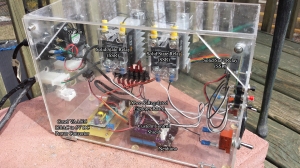 The two solid state relays turn the pumps on and off based on 5V signals from the Netduino and custom controller board. They are powered from a single plug and main on / off switch that also powers a 120V to 5V converter board. This converter board I cannibalized from the previous mainboard through a tactical mitre saw cut that kept the 120V and 5V header circuitry intact and removed all the old PICAXE circuitry. It’s not pretty, but it gets the job done. The 5V output powers a fan that blows directly on the SSRs to keep them cool as well as the Netduino.
A header allows a Sparkfun Xbee Regulated Explorer board to plug into the control board and receive the wireless transmissions from the grant and sparge arm end-devices. This Xbee is set up as the network “coordinator” and any signal is transmitted back to it. There is also a very colorful 6-wire rainbow jumper that runs from the control board up to the custom LCD backpack I posted about a couple weeks ago. The LCD backpack takes care of the output to the screen as well as recognizing when one of the buttons is pressed and sending an “interrupt” message back to the microcontroller so it can process the user input.
I still hope to replace the enclosure with something more sleek and industrial at a future date, but this will keep be brewing in the time being and allow me to resolve issues and upgrade in the meantime.
Now for the parts list, as best as I can manage. You will have to forgive me – many of these items I sourced back in 2007/2008 and I can’t remember where they came from or how much they cost – so I did my best to hunt down equivalents in today’s online environment.
| Quantity | Description | Unit Cost | Total |
|---|---|---|---|
| 1 | Netduino microcontroller board | $35 | $35 |
| 1 | Cosel VAA505 5V 1A Power Converter | $18 | $18 |
| 2 | Crydom D1210 Solid State Relays | $40 | $80 |
| 2 | 2″x3″ Crydom aluminum heatsinks | $18.50 | $37 |
| 2 | Plastic SSR covers | $4.50 | $9 |
| 1 | 20×4 LCD Character display | $18 | $18 |
| 1 | Custom control shield PCB (OSHPark) | $25/3 | $8.50 |
| 1 | Custom LCD backpack PCB (OSHPark) | $18/3 | $6 |
| 1 | MCP23017 Digital I/O IC | $3 | $3 |
| 1 | CMOS 4070 Quad XOR gate IC | $0.50 | $0.50 |
| 3 | Push buttons | $1 | $3 |
| 2 | Heavy-duty switches | $3 | $6 |
| 1 | 10k linear potentiometer | $1 | $1 |
| 1 | 12″ 6-pin jumper wire | $1 | $1 |
| 1 | 5V Fan | $5 | $5 |
| – | Fan covers (front & back) | $5 | $5 |
| – | Misc. resistors, terminal blocks, etc. | ~$10 | ~$10 |
| – | Misc. wires & connectors | ~$10 | ~$10 |
| – | Misc. screws & mounting hardware | ~$5 | ~$5 |
| 1 | Plexi enclosure box | (Free) | (Free) |
| 1 | Repurposed computer cord | (Free) | (Free) |
| TOTAL: | ~$261 |
Wireless Grant Build
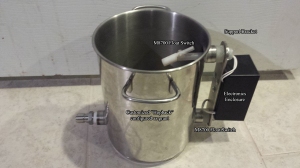 Much of the build for the wireless grant was posted in the previous two posts. I will try not to repeat things that have already been covered and focus on those things that are unique to the grant. The grant is actually based on the MoreBeer hopback with the addition of another 1/2″ stainless half coupler located 180° from the lower outlet coupler. 2 Madison 8700 horizontal float switches occupy the two half couplers on the same side, spanned by a custom-fabbed 1/8″ stainless steel support for the electronics housing. These float switches have a pivot point well clear of the threaded half coupler and allow the floats to move freely, which is an important criteria when selecting / sourcing them. As I found out, the stainless switches I bought a few months back can’t be used for this reason.
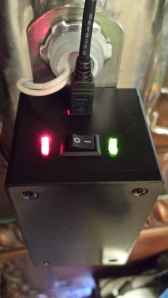
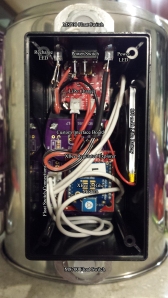 The outside of the electronics housing is identical to the wireless sparge arm with an on/off switch, two LEDs, and a port to recharge the LiPo power supply, although they are located on the bottom of the enclosure to limit the potential of unwanted liquid getting inside. Internally the layout and quantity of components is identical to the wireless sparge arm with the exception of an addititional header for another switch.
From a cost perspective the wireless grant is in the same neighborhood as the wireless sparge arm. One issue to navigate is getting an extra coupler welded into the grant, a service that MoreBeer no longer offers. That said, here is a reasonable estimate:
| Quantity | Description | Unit Cost | Total |
|---|---|---|---|
| 1 | MoreBeer Hop Back With 1/2″ Threads | $100 | $100 |
| 1 | 1/2″ Stainless Steel Half Coupler | $3.50 | $3.50 |
| 1 | Welding service to put in 1/2″ coupler | ~$35-50 | ~$35-50 |
| 2 | Madison M8700 horizontal float switches | $12 | $24 |
| 1 | 12″ long 1/8″ SS bar stock (for support) | $6 | $6 |
| 1 | 2″x2″x4″ Project Enclosure | $5 | $5 |
| 1 | Custom XBee interface board (Mfg @ OSHPark) | $16.20/3 | $5.40 |
| 1 | SparkFun LiPo Charger | $15 | $15 |
| 1 | SparkFun 850mAh LiPo Battery | $8 | $8 |
| 1 | SparkFun Xbee Explorer Regulated board | $10 | $10 |
| 1 | Digi Xbee 2.4GHz Wireless Modem | $26 | $26 |
| 1 | On/Off Switch | $0.50 | $0.50 |
| 1 | JST Connection wire | $1 | $1 |
| 8 | Circuit board standoffs & screws | $3 | $3 |
| * | 3/8″ stainless steel bolt, washers, and nut | ~$2 | ~$2 |
| * | LEDs, connectors, wire, etc.. | ~$5 | ~$5 |
| TOTAL: | ~$250-$265 |
The final build post will be about the pump control box, or at least the interim / retrofitted one I am using for now.
Wireless Sparge Arm Build
This week’s activities included the final build of the wireless grant and wireless sparge arm for BrewzNET 2.0 – I will focus primarily on the sparge arm in this post, and the grant in a subsequent one. Make sure to click on the pictures to blow them up so you can also see the labeled components.
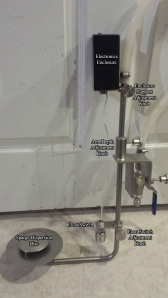 As has been mentioned in prior posts, the base for the sparge arm is a standard MoreBeer Ultimate Sparge Arm that I have pimped out with some custom components. There are multiple adjustment knobs that set the height of the sparge arm itself inside the mash tun, the height of the float switch, and if required the height of the electronics housing. Both the stainless steel float switch and electronics box are supported with another MoreBeer special order item that is not in their online or mail-order catalog, the SCUP405. I had to write to their customer service department and ask if they had a solution for supporting the float switch, and that is what they came up with. After I received the first one I realized how perfect it would be for also supporting the electronics and ordered a second.
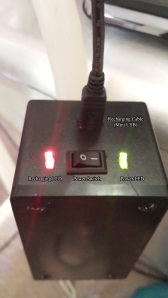 The top of the electronics housing has 4 components – an on/off switch, a bright green LED indicating whether the power is on or not, a bright red LED that reflects the device’s current charging status, and a mini USB port to recharge the device in between brewing sessions. When the device is plugged into a standard USB cable and power source (wall charger, laptop PC, USB hub, or whatever) the red LED remains lit until the battery is fully charged, at which point it turns off. I did some preliminary test several weeks back and found the battery would power the electronics for more than 4 hours (more than adequate for the typical brewing session) so I did not determine what the ultimate life of the battery was… It could potentially be good for several brew sessions.
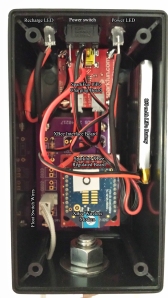 The 2″x2″x4″ plastic electronics housing does a nice job of encapsulating the circuit boards and components. I could have maybe used a slightly thinner project box, but I like having a little extra space to accomodate my sausage fingers when assembling. At the top is the SparkFun LiPo Charger board that serves as the recharging and use interface between the remaining components and the LiPo battery. A custom PCB design acts as the interface between the 3.8V supplied by the LiPo battery & charger to the Sparkfun XBee Explorer Regulated board and ties the float switch to the appropriate pins on the XBee modem.
So what did the wireless sparge arm cost, in total? I’m scared to total it up because I know my wife reads these posts too (when I don’t bore her silly enough to quit half way). Here’s the raw materials / components breakdown:
| Quantity | Description | Unit Cost | Total |
|---|---|---|---|
| 1 | MoreBeer Ultimate Sparge Arm | $150 | $150 |
| 2 | MoreBeer SCUP405 supports | $10 | $20 |
| 1 | Stainless Steel Float Switch | $8 | $8 |
| 1 | 2″x2″x4″ Project Enclosure | $5 | $5 |
| 1 | Custom XBee interface board (Mfg @ OSHPark) | $16.20/3 | $5.40 |
| 1 | SparkFun LiPo Charger | $15 | $15 |
| 1 | SparkFun 850mAh LiPo Battery | $8 | $8 |
| 1 | SparkFun Xbee Explorer Regulated board | $10 | $10 |
| 1 | Digi Xbee 2.4GHz Wireless Modem | $26 | $26 |
| 1 | On/Off Switch | $0.50 | $0.50 |
| 1 | JST Connection wire | $1 | $1 |
| 8 | Circuit board standoffs & screws | $3 | $3 |
| * | 3/8″ stainless steel bolt, washers, and nut | ~$2 | ~$2 |
| * | LEDs, connectors, wire, etc.. | ~$5 | ~$5 |
| TOTAL: | ~$258.90 |
So that’s the wireless sparge arm. I’ll hopefully have some video of it in action up soon (once I get the other pieces finalized and tested). It’s certainly not the cheapest piece of brewing gear ever, but it certainly looks good and is one-of-a-kind… for now 🙂
Mainboard Shield Ordered
I simplified the mainboard from my previous post. I’ve been having problems getting steady signals from the XOR CMOS chip and tracked it back to an issue with nearly all of my signal converter boards from Sparkfun. I don’t know exactly why, but the output from Channel 1 always seems to be weak and the CMOS IC has a hard time determining whether it’s a high or low signal – so it flickers between the two. I was using that converter to scale the 3.3V signal from the Netduino up to a 5V signal, but after doing some testing I found that is completely unnecessary. The output from the XOR chip is much better and rock-steady when driven directly from the Netduino pin, even though it’s mixing a 5V signal from the override switches and the 3.3V signal from the Netduino. Simplification is a good thing, right?
I placed the order for the boards this morning. Hopefully that means they’ll be in the mailbox in about 2 weeks. Upon further reflection I suppose I could have shifted the resistors up into the vacant space previously occupied by the signal conversion board and made the entire shield footprint smaller (and cheaper by probably $5-10), but it’ll be a standard shield size and shape for now. If I find the board needs revision I’ll make the change at that point.
OSHPark Rocks!
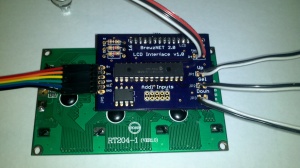
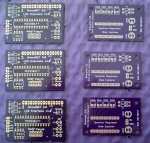 My first two board designs arrived from OSHPark in triplicate today in the mail! They are very well made and look exactly like the renders on the website – I couldn’t be happier with the results. It took me almost no time to solder up the LCD interface and replace a large portion of my breadboard circuit with the LCD backpack, shown below. I didn’t bother with IC sockets or headers for the switches, I just soldered everything straight to the board. I’ve got 2 more in case I need them, and MCP23017 and 24LC chips are cheap enough that I don’t re-use them. Yes, my jumper cable is rainbow-licious. I know.
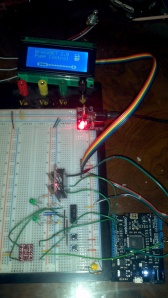
For giggles you might consider comparing the pics above with the one I posted a few weeks ago in “Tedium and Minutiae” – it is a good reference for how much smaller the designs get when you translate from breadboard to printed circuit boards.
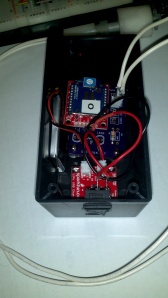
The end-device boards work well too, although I have not finalized placement in the project boxes, nor determined exactly how I plan on attaching them to the sparge arm and grant… but for now, I’ve got USB-rechargeable wireless end-devices that should be a snap to integrate into my brewing gear. I am also trying to decide if I want to use a LED to show on/off status, and where exactly I will place it.
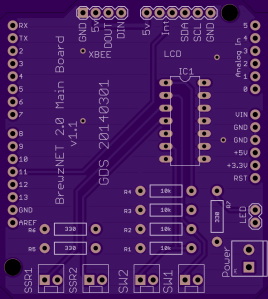
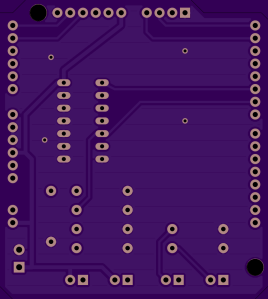
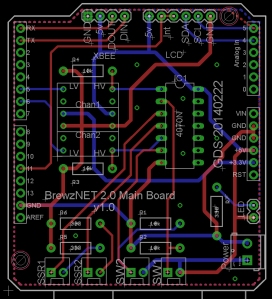
In addition to those changes I also removed the XBee shield I was using on the Netduino and wired it to an external regulated board to validate wiring for what will likely be the third and final board I order from OSHPark – The main board. It will contain the logic chips and signal voltage converters to drive the SSRs (Solid-State Relays that turn the pumps on and off), as well as a simplified XBee interface to do away with the need for the Xbee shield. I am not convinced the shield isn’t contributing to my phantom reboot error from posts past, but regardless my custom shield eliminates the need to use the XBee shield entirely. While I am still revising small details, the draft Eagle board layout is shown below.
Open items I am thinking through before finalizing the design and ordering is whether to peg the other two XOR logic gates on the 4070 IC to ground or just leave them floating, and whether or not to add a set of solder pads inside the header rows that can also be used. I am leaning towards “YES” and “NO” respectively, but I will likely have made a final decision by the end of the weekend. I also need to spec out and procure a large project enclosure for the Netduino & mainboard shield, SSRs, switches & LCD, cooling fan, power supply, and other assorted power wiring. While I could potentially repurpose the current enclosure, I think I want to start fresh… and the whole “see the guts of the machine” appeal isn’t really doing it for me anymore. I think a nice mysterious “magic box of coolness” is more my style these days.
Has it really been 6 years since I created the first control box? Geesh – Time flies.
Designing and Ordering PCBs
This long weekend I spent some time getting re-acquainted with Eagle, which has had several new versions since I last used it. It’s a powerful and full-featured software tool for designing circuit boards, and best of all there are versions of it that are free for hobby and non-profit use. When you combine that program with online Printed Circuit Board (PCB) services like OSH Park, it is extremely easy for someone to design custom electronics like my BrewzNET stuff. I’ll try not to make this post too technical in the off chance you want to read more than just the first paragraph.
 PCB design starts with a “schematic”. These are basically abstract drawings that show the various components in your circuit and how they are hooked together. The first one I tackled was the board that interfaces my liquid crystal display (LCD) with the microcontroller. The heart of the circuit is the MCP23017 digital input/output expander chip. This component connects to several different points where I can attach switches (all of the GPA* pins), as well as to the LCD screen (all of the GPB* pins). There are a couple of resistors here and there to keep signals trued up to the correct voltage. There is also an additional chip called an EEPROM that is used to store system settings. The EEPROM is sitting on this board with the LCD because it shares the same communication protocol with the microcontroller, called I2C. The schematic is created by selecting components out of the Eagle component libraries and then wiring them together using the green lines.
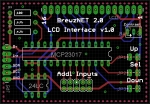 Once the schematic is complete it can be converted over to a PCB board using a menu item. Initially the board is blank and all the components are set off to the side, and it is up to you to drag them on to the board, position them the way you want, and begin “wiring” the components up. There is even an “Autorouter” tool that will do most of the routing work for you, and you can go back after to clean things up if required. The red lines are the “traces” (wires) on the top of the board, while the blue ones are on the bottom side of the board. The white and gray colored shapes show the orientation of the various components, and the green circles and ovals are the “pads” where the components are soldered on. I’ve also added some text in places to help identify the intended use of the components.
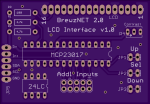
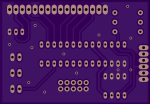 When the PCB layout is all done, you’ve double-checked all the connections against your prototype circuit and the datasheets, and you want to get a prototype made – that’s where outfits like OSH Park come in. They will take the output from Eagle (and in the case of OSH Park, they use the Eagle 6.5 board file directly) and convert it into the information they require to manufacture your circuit. For my LCD interface board it’s less than $20 and I get 3 copies. They professionally etch and silkscreen the board in a large “panel” with many other designs, cut the panel into the individual pieces, and send you your copies in 2-3 weeks. The reason for the long turnaround I believe is that they are being manufactured in Asia and take a little while to find their way back to the US. In my case, I submitted them this morning (Feb 17) and they should be back sometime around March 1 (plus a couple days for USPS to deliver them to me).
I really hope this first run with OSH Park goes well. Getting low-cost professional boards (even if it takes some time) beats the heck of wrestling with printing the traces, etching boards, ironing on silkscreen layers, cutting the boards down, drilling all of the holes out by hand… I did that for the first version of BrewzNET back in 2008 and while it worked, it was very laborious and was not pretty. It also has health hazards associated with it (fiberglass dust from drilling the holes, the corrosive etchant used to make the boards…) so a commercial avenue to have this work done for me sounds much more appealing for multiple reasons.


You must be logged in to post a comment.